Sunday, April 8, 2012

My First CSA!!!

Greetings all!
Today I wanted to share with you my first forey into a CSA (Community-supported agriculture).
What is a CSA you ask?

To quote from Wikipedia ( http://en.wikipedia.org/wiki/Community-supported_agriculture )

"Community-supported agriculture (in Canada, community-shared agriculture) (CSA) is an alternative, locally-based socio-economic model of agriculture and food distribution. A CSA also refers to a particular network or association of individuals who have pledged to support one or more local farms, with growers and consumers sharing the risks and benefits of food production. CSA members or subscribers pay at the onset of the growing season for a share of the anticipated harvest; once harvesting begins, they receive weekly shares of vegetables and fruit, in a vegetable box scheme, and also sometimes herbs, cut flowers, honey, eggs, dairy products and meat, as well. Some CSAs provide for contributions of labor in lieu of a portion of subscription costs."

As I started researhing locl CSAs to my area I came across Evergreen Meadow Farm ( http://www.greentowns.com/initiative/community-supported-agriculture/evergreen-meadow-farm-rockwell-nc ) in Rockwell NC, which is not even 5 miles from my house.

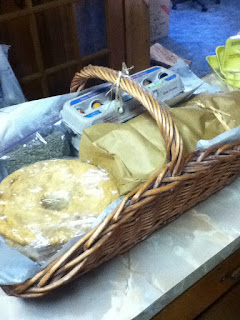
Yesterday (Satruday, April 7th) I made my first pickup of goodies. Katiue French is the propritor of Evergreen and met me at the main gate to her farm with a basket full of Easter Cheer!


This week the package contained, Challah Bread, Angel Food Cake, Naturally Dyed Easter Eggs (Hard Boiled), 1 Dozen Farm Freesh Brown Eggs and a Bag of Lavender Heads (which smell so good!)


These Lavender Heads just make a room smell good!


and yes the bread is as good as it looks! We also had some of the eggs with breakfast this morning as they were devine!


Cant wait to see what goodies ill get next week!!

Until then...

Cheers!

Garden Update (Early April 2012)

Just wanted to share some photos of my new expanded Garden for this year. I have gone from 1 plot to 2 plots and Hugelcultur bed, and another ground strip for planting. I have also expanded by herb garen and made it into a raised bed.

First the original plot..


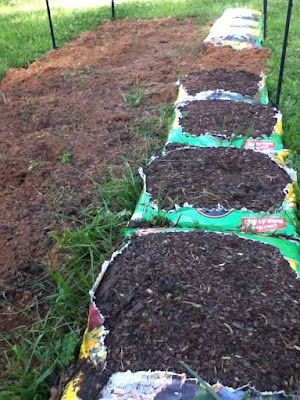
Next, the new 2nd plot with a bag soil experiment


Here yo can see that these two plots are side by side..


In the bags I have already panted onions and potatos.

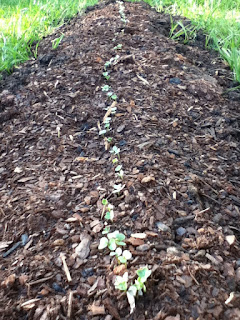
Here is the Hgelkultur bed with new soil and my radishes coming up..


Here is the new and mproved raised bed herb garden....


In which I have Scallions, Thyme, Oregano and Rosemary...


I will post more at the end of the month so you all can see the progress!

Until next time....


Cheers!

Sunday, April 1, 2012

Beer with Fritz: Kegging

How to make a Kit Beer...Part Three

Is the beer ready to rack to the keg?


THAT...is the question!

OK, So I opened the Secondary fermenter and MAN...IT SMELLS SO GOOD!! The beer looks good, no contamination noted and the aroma is spot on!

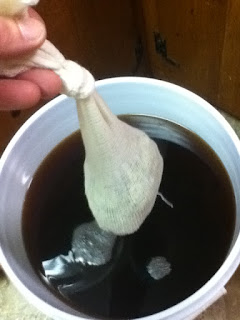
I fish out the Hop Bag (which contained my cascade hops) that has been dry hopping the beer for the last week.


At this point I break out the Hydrometer and get it into the beer to take the readying. Remember last time we have a Specific Gravity of 1.012. If it is the same we can go ahead and keg the beer as that reading indicates that the beer has completed fermentation.

and what is the reading?

I know its hard to read but it is infact 1.012. Its good to keg!

 OK, at this point I sanitize the keg and the racking tubing I will be using. Once clean and sanitized I get everything into position.

and let the beer flow! Now keep in mind I am not splashing this into th ekeg. I still want to keep oxygen esposure to a minimum. So the racking tube is at the bottom of the keg and is filling it up from the base of the keg.


Now I bleed off the air and let the CO2 get in and do its magic. It should be fully carbonated within the next couple of days. But of course , it has to wait fo rthe upcoming Loch Norman Highland Games!!

On the next Beer with Fritz...taste tests and kilts!!

Until then....

PROST!

Monday, March 26, 2012

Beer With Fritz: Dry Hopping in the Secondary

How to make a Kit Beer...Part Two

Racking to the Secondary and Dry Hopping!!

So my original plan was to transfer te beer to the secondary yesterday (Sunday the 25th) BUT...
I ended up cutting downa storm damaged 35' cyprus tree from my front yard, adn that took ALL afternoon! But thanks to My Wife and Daughter and Best Friend Eric Watkins, it went pretty easy (even though the chain saw ran out of chain oil and stopped working until we put more in ;) )

OK, back to the Beer!

(stay on topic...stay on TOPIC!)

From the title you can see I am using some new words in ou Beer Brewing discussion. So lets quickly go over what the heck I am talking about.
Lets see, we have Racking, Secondary, Dry Hopping...and later on Trub...

First...Racking:
Racking is the act of transfering via siphoning your beer through a tube and in my case, to another fermentor.

Second...Secondary:
The secondary fermentor is another fermentation bucket that you transfer your young beer (yes it is now beer and not wort) into.

Third Dry Hopping:
Dry Hopping is where you place Hop Cones (in this case Casecade Whole leaf) in a muslin bag and drop it int the Secondary for 4-7 days. What this does is impart an incrediable amount of aroma to the final beer. Since we are not boiling the Hops, no bitterness comes out of these leaves.

Finally....Trub:
Trub is the crap left at the bottom of your Primary (AKA..you first fermentor) It is mainly dead and dormant yeast cells. Thi sis what you DO NOT want to transfer into your secondary!

OK, now for a pictorial...

Here we have the young beer in the Primary Fermentaion Vessal.


and here is the whole leaf Cascade Hops


note: before I open up the primary I completely sanatized the secondary bucket and all the tubing for the racking.

Below you can see through the side of the primary, the trub and fermentation leftovers on the inside

YUCK!
Now I open the bag with the hops in it and place them into the muslin bag..


Now that I have the hops into the bag, I tie the end in a knot, and she is ready to go!


Now I remove the lid from the Primary.....OH MY GOD!!! ITS SMELLS SOOOOOOO GOOD!!

Now I fill my transfer tubing is purifed water and begin to Rack!!


Now I present you with a much cleaner young beer!!


and left over in the Primary is the Trub and Crap!


Now its time for the addition of the Dry Hops!


A quick reading of my Hydrometer.....
WAIT A MINUTE!! What's a Hydrometer?

A Hydrometer measures the amount of residual matter in a liquid. At 70 degrees F, Water have a reading of 1.000. The more "Sugar" left in the Wort or Beer lets you measure, over time, what the % of Alcohol in the Beer.

Soooo, I started with a reading of 1.058 and now...


(I know its hard to see) its 1.012 which gives me about 4.6% alcohol.

OK, I place the lid on and reatatch the air lock on the secondary.


Moving the secondary to my fermentation spot, ill allow it to sit until next Sunday, at which point I will pull out the hops and take another hydrometer reading. If it is again 1.012 then it will be ready to transfer into a keg. If it has dropped some more, that means the yeast is still making more alcohol. If that is the case then I will close it up and let it sit for another week. The ntake another reading. What you want is an unchanged reading over a weeks time. That generally indicates that the beer is ready.


So ..next time on Beer with Fritz....is it ready?

Stay Tuned!!

PROST!!!

Wednesday, March 21, 2012

How to make a Kit Beer

On today special blog I will go over with you all my first brew brewing of the 2012 season. In honor of the upcoming 19th Rural Hill Scottish Festival and Loch Norman Highland Games ( http://ruralhillscottishfestivals.net/index.htm )
Every year for the past 6 years I have attended thee games with my many of my good friends. We have camped out every year, rain or shine (and boy has it rained at times!!)
So I thought it would be great fun to drink the beer I made!!

Soooo with out further ado......this is how to make...

BEER WITH FRITZ!!


Your first question must be how to I start. Well, first step, decide what kind of beer you want to make.
The simplest and lest time consuming is brewing top fermenting Ale. 2-3 weeks from start to finish and you are drinking the freshest, most satisfying brew!! Lagers are bottom fermented beers and must be "lagered" or cold fermented for long periods of time. So I dont have that much time, it will have to be an Ale.
OK Ale it is, no next question, what kind of Ale? There are litterly thousands of different kinds of ales, mos unknown to modern man. For this nrewing journey I concidered that it will most likely be a little hot, so no dark beers (like porter of stouts) that leaves, Pale Ales, IPA, Amber Ales, Wheat (Weisse) Ales, German Ales, Real Ale, English Bitter etc...)
My choice, is a classic American Pale Ale, cloned after one of my favorte ales...Sierra Nevada Pale Ale!! ( http://www.sierranevada.com/ )
This Pale Ale is the defacto standard for all Amerian Pale Ales brewed in the country (and around the world I bet!) Amber in color, Slightly Bitter and overflowing with the taste and aroma of Cascade Hops!  (yum!)

OK ok, enough ramblings...lets get Brewing!

One of the easiest ways to brew is using a prepackaged kit like the one I bought from Alternative Beverages in Charlotte NC ( http://ebrew.com/ ) More specificly the High Sierra Pale Ale DME Kit   ( http://ebrew.com/amber_ales/high_sierra_pale_ale.htm )

The cream color powder you see in the above picture is Light Dry Malt Extract (LDME) which is basicly Sugar made from barley. The redish package on the right is a American Ale Dry Yeast Packet. On the back of the bag (seen below) are the cracked grains, Hops and a few other goodies..


OK first things first! The most important thing you can do when brewing beer is..
Sanitize EVERYTHING!!!
I use a product called Iodophor, I couple minute soak in this stuff and all your peices and parts are free on anything that might ruin your future beer. Unsanitzed equipment WILL lead to spoiled nasty beer!!


Now that my equipment is sanitized, I can start the brewing process. The next step is....

Creating a Starter for my yeast!!

A starter, what the heck is that?!! you say. Ok ok, first, what is yeast? Yeast is a fungus that feeds on sugar and oxygen. When it has pleny of food it has a yeast party. From this party it takes 3 things.....more yeast (babies)....CO2 (Gas) and Alcohol. Yeast comes in dry or liquid form. Liquid is ready to pitch witout a starter.
Now when brewing with Dry Yeast, you can drop the yeast on top of the Must (Must is what Beer is before it has fermented) and it will start fermenting...but its startup time is slow....8-24 hours (which is plently of time for other nasty wild yeasts and bacteria to possibly take hold. A starter will get the yeast going to the point that when you pitch them (that means dump them on your must) You will get very quick startup of your primary fermentation.
To make a starter you need a flask and some purified water (I used a britta filter to get clean water for this...)


To the water I added some corn sugar (which came with the kit and is normally for priming beer bottles, but since I use a keg, I didnt need it) and some yeast nutrients (I have some from the last couple of batches of wine that I made)

To this sugar nutrient mix I add the contents of the yeast pack...

and give it a little swirl.....


Next I attached a air lock (to keep any floating crap out of it) and put it aside to start its work.


Now I fill my brewing kettle up with 2 gallons or filtered water and set it to boil and I then add 3.5 gallons to my fermentation bucket....


Now its time as the water is heating up to add the LDME (seen below)

As this premash gets to about 150 degrees (at medium high heat (pre-boil) its time I take the cracked grain, called specialty malts, and put it into a into a mesh sock. I do this so that I can steep this like a tea bag. It adds flavor and color to the beer.

Now lets check back on the yeast starter I have going......


OH YA!! Its starting to crank!

OK, After steeping for 20 minutes, I crank the burner to high to acheive a boil. Once at a boil I take out the grain sock.


Now its time to add the bittering hop pellets. Hops are actually a cone of the hop plant. Within the cone are oils. these oils are what give beer its great smell and taste. For the bittering addition I am using Hop Pellets.


These pellets are just thrown into the pot and a quick stir and now I set the timer for 35 minutes at a full rolling boil. ...Hey lets check back on the starter....!


HOLY SMOKES!!! ITS ALIVE!!

Now after 35 minutes of boiling we add a Whirlfloc Tablet ( which causes proteins to strick together which causes th eglobs of gook to stick to each other and fall to the bottom of the pot, which allows easier transfer of the Wort (Wort is the Boiled Must)...
After the Whirlfloc goes in its time to add the Flavoring Hops. In this case its 1/2 oz of whole cone cascade hops!!

It also goes into a muslin sock!!
and into the pot it goes!!!


Now after ten minutes I remove the hop bag.....

and move the hot pot into a bath of ice water in the sink.
Why do this? Well as the Wort cools it becomes very inviting to the wild yeast in the air itself. We want to get the Wort down to pitchable tempatures (below 80 degrees F) as quick as possible!! About 10 mintes i this water bath and I siphon out the wort into the 3.5 gallons of cold filtered water. Which results in 69 degree F chilled Wort..PERFECT!!

Now to add our yeast starter. I give the flask a littel swirl...

and pour it in!!

Now I set the top on the fermentation bucket and put the airlock from the starter in the bung hole of the lid. I then add some vodka to the air lock and move the Fermenter into its resting spot in the Dining room.


To keep its tempature a little more constant, I wrap the fermenter in a towel....


Now I wait! In one week (I brewed on Sunday April 18 ) I will transfer this young beer (yes there is now Alcohol in it!) to wat is called a secondary fermenter. At that time I will add my final sock of Hops, in this case 1 oz of Cascade Whole hops. This is called dry hopping. It imparts no bitterness or flavor, but adds a tremendious amount of hoppy aroma to the finished beer.

So...next time on Beer with Fritz....The secondary BEGINS!!!

PROST!!!